Bicycles
Choose bicycle frame size according to your height
| Mountainbike, MTB inches | Hybrid or Roadbike | Height in centimeters |
|---|---|---|
| 13 | 14 | 140-155 |
| 15 | 16 | 150-165 |
| 17 | 18 | 160-175 |
| 19 | 20 | 170-185 |
| 21 | 22 | 180-195 |
| 23 | 24 | 190-205 |
They say that the free space between frame and a cyclist who is standing
on the ground should be between 7 and 10 cm.

How to switch Gears
Basic idea - the chain has to be set straight to avoid "diagonal" position
which would create additional friction and, therefore, would reduce the life time
of the chain and chain wheels.
If you have three gear wheels in the 'system' (front gear wheels, left shifter)
and seven in the 'cassette' (back gear wheels, right shifter), then theoretically your
bicycle has 3 x 7 = 21 speeds. However, it is not suggested to use them all.
Shown in the image, when in 3rd gear, the chain is on the larges wheel in the system


You can use the three smallest cassette gear wheels with it
so possible variants are:
3-7, 3-6, 3-5.

With the 2-nd (middle) system gear wheel you can use the middle cassette gear wheels:
2-5, 2-4, 2-3
1-st (smallest) gear wheel can work with largest cassette gear wheels:
1-3, 1-2, 1-1.
Consecutive gear switching from the lowest 1-1 to highest 3-7 has to be done
approximately like this:
1-1 → 1-2 → 1-3 → 2-3 → 2-4 → 2-5 →
3-5 → 3-6 → 3-7
So there are about 9 available speeds.
Nipple Types

How to pump Presta Valve
INSTRUCTIONS
1. Take the pump. Reassemble it: unscrew the nut, remove the rubber and the bearing
. Then reassemble the pump. Install the plastic bearing with the narrow end down. Install the
rubber with the wide end down. Throw up the nut and fix it.
2. Take the tube. Unscrew the nipple by turning it a few times. Put on the pump. Pump the tube.
3. Take off the pump. Screw the valve.
How to lace the wheel
Spokes Setup:
Groupset level
On some websites that sell bicycles, equipment, for example shifters,
is characterized as «basic level» or «city journey» or something else.
I have tried to
match these names with the existing Shimano equipment. Starting with the cheapest and ending
with the most expensive.
For MTBs:
| Shimano Equipment (cheapest on top) | Group characteristics |
|---|---|
| Tourney | Basic level - cheapest and most unsophisticated Shimano equipment. It is used for start-up bicycles. These componens are work well enough only for calm journeys in the park and some easy routes. |
| Altus (does not exist anymore, combined with Acera) | It seems reasonable to characterize it as basic |
| Acera | Upper-basic level. Not so long ago Altus and Acera were united under Acera name, because they had small difference. Is used with cheap basic or sometimes cheap middle level bicycles. |
| Alivio | "Cruise" level is for intermediate level cyclists (I use this type). These components have acceptable quality for casual usage of bicycles, and have a relativly low price. It is used with a wide variety of new basic and intermediate level bicycles. |
| Deore | Upper-intermediate level which is suitable for frequent usage and for trainings. Reasonably high quality and reliability of components. For intermediate level bicycles. |
| SLX | Semi-pro level. High quality and reliability but relatively low price (for pro =)). Best price/quality ratio for those who are real bicycle fans. |
| Deore XT | Much cheaper then XTR, but also can be called professional. It is used for cross-country races. It is pro-quality for an affordable but high price. |
| Zee | Less costly version of Saint |
| Saint | Developed for extreme stresses of freeride and downhill. Highest reliability and effectiveness of all units provides clear functioning during downhill rides and jumps. Price is really high. |
| XTR | Professional equipment that is used for top-level cross-country racing. Highest reliability, precision and lowest weight. Made for professional cyclists. All state-of-the-art technologies are used in XTR. The price is extremely high. I recommend to check the website you can even find electriciy-driven gear-shifters there. |
How to setup gear shifters
Check the location of the switches. The front should be parallel to the system. Distance between the big gear in front
and the strap (it can be pulled by hand) should be 2-3 mm.
We tighten the lambs (kegs), adjusting the tension of the cables, to the stop and then unscrew about one full turn.
Rear Gear Shifter
At the back we put on the smallest gear, in front in the greatest.
Let's release the screw holding the cable of the rear interloper.
On the switch with a screw with the designation L we set the switch so that the small cassette gear and two gears
switch were in the same plane.
We pull the cable with the hand as much as possible and pull it with a screw.
Check how the rear switch works. If it does not go well for big stars - we pull the cable by turning the lamb on the right sticker
against the hour hand.
We toss the chain to the largest gear behind.
Turn the H screw on the switch so that the gears lie in the same plane.
Front Gear Shifter
We put the chain on the biggest star behind and the smallest in front.
Let's release the cable going to the front switch.
Using a screw on the switch labeled L , move the frame so that the distance from the chain to the inside of the frame is about 3-4 mm.
We pull and fix the cable.
On the rear switch we set the smallest gear on the front gear to the second gear.
If the chain touches the outside of the frame
pulling the cable by turning the lamb on the left stick counterclockwise.
We toss the chain to the largest gear in the front.
If the chain touches the frame, use the adjusting screw H change the position of the frame until the chain begins to move without friction against the frame.
For ease of understanding, I recommend watching the video.
How to remove cassette
You will need some wrenches, an adjustable spanner and a special cassette removal tool.

|

|
After you have tightened the wheel you need to check if it is too tight.
Rotate the wheel and wait after it stops. If it makes a small but noticeable move
to the opposite direction then it is okay.
If it does not make this move, slightly loosen the nuts.
Meanwhile in Russia
A solution is simple - you do not have to pull your hand up, but push down width all your weight, after putting
wheel in a convenient position.
wikibooks.org
How to Protect Your Bicycle From Beeng Stolen
When I lived in Lappeenranta and after I moved to Tampere I always read some Facebook messages about stolen
bicycles. It is impossible to guaranty that your bicycle will not be stolen from you when you need
to leave it somewhere near the university or near a shop. This being sad I am quite certain that many of
the stolen bicycles
were not protected properly and therefore became an easy target for thieves. Shown below are some
examples from the neighbourhood. If it is
your bicycle that I accidentally took photograph of, and you do not want it to be here just send me
a message and I will remove the image.
The first and the most important rule that you have to keep in mind:
The more expensive your bicycle is, the stronger protection it requires

|
It sounds simple but people do not always take proper precautions. If you are using a
10 years old used bicycle, you can probably rely on a simple lock like the one shown in the
left picture.
If your bicycle is old and does not have any expensive details it is most likely not easy to sell. It is probable that thieves will not look at it, but you never can know for sure so always make certain to lock up your bicycle properly. |
 |
When you have relatively new bicycle it is necessary to have a chain lock like shown here.
You must and lock it through the frame to a solid object. |

| I would recommend
to use two locks: as a first lock use the chain lock, as lock depicted above, and as an additional lock use the long cable lock like this one
(try to avoid buying a cheap lock).
Usually it is difficult to find universal lock because long locks are thin and thick locks are too short. |
This is how I use them together:

You have to keep a heavy chain lock somewhere in your bag, due to the weight and size. This might result in you forgetting about it's whereabouts and this is why you should always keep a cable lock on the frame (try not to forget keys). I also recommend to put the chain or cable inside the wheel, especially if you have a fast removal system.

For cheap bicycles a cable lock is probably enough protection, but to me, this cyclist underestimates his bike. You can see a GT bicycle secured only with a cable lock (he or she does not leave it overnight which is good): 
|
| Sometimes the heavy lock is too short to protect your wheel, this is one more reason to have two locks. |
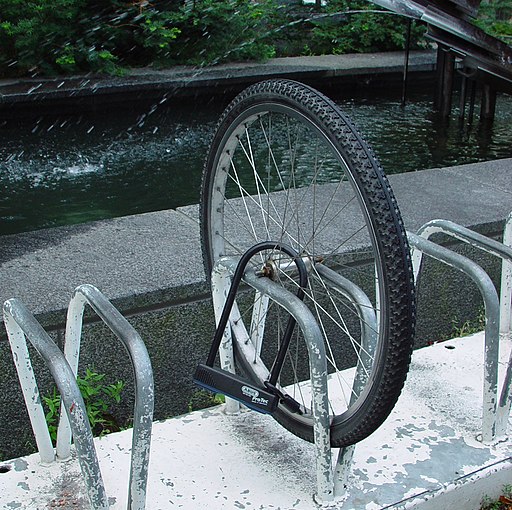
| And this is how I don't recomend to secure your bicycle: | |

|  |
If you lock your bicycle trough only one wheel this is what might occur.

| There are also U-type locks. You can use them instead of a chain lock. I would reccomend to use the U-type only in tandem with a cable lock. |
Here is a good example of using this type of lock:

The owner of this nice (I guess one of the best non e-bikes in the neighbourhood)
Bianchi
bicycle is aware of thieves and doing everything right.
Bicycles have to be protected from easy thefts. For example it is
quite easy for someone who has a car to lift up the bicycle with the lock still on and leave.
It is also possible that someone can come along with metal clippers and cut through the
cable lock. But if this bicycle is also secured with a chain lock then it will be much
harder to steal, as it requires more effort and equipment to remove the lock.
The thief will see that he needs to
use many of his skills and various equipment (clippers and car)
to steal your bicycle so, he will probably choose someone else's bicycle.
If you leave your new
Cannondale outside
overnight, your bicycle will most likely not be there in the morning because the temptation
of such and exquisite brand is unavoidable for thieves.
| Important details about the keys - try to choose a lock which comes with thick rigid keys. Thin keys are easily destroyed inside the lock, especially when it is cold. | |
| These keys are strong and will not break easily. | This one here is not very reliable and might break. |
 | 
|
| Try to not forget to oil the lock from time to time. | |
Bicycle Components

How to check used bicycle before buying it
Check the brakes, they must effectively work, and start to break before the handle touches the handlebars.
Is there any play in the system / carriage / connecting rods - you can just grab the connecting rod and try to loosen it.
Does the bicycle have all the spools.
Is the cassette aligned with the system. When pedaling (you can do this aweigh) the cassette should not be
shaking from side to side, it is necessary that
it just spun around its axis.
Backlash of a steering column, as at turns from the left to the right, and in a vertical direction.
The steering wheel should be turned on the move and press / tug
for him in a static position.
Appearance of parts, their wear and tear, condition of cables, brake pads, grips, etc.
Sounds issued by a bicycle: no squeaks and knocking should not be. Ratchet can crack, that's ok.
Pull the bicycle «in reverse», the pedals should not spin.
There should be no rust, for the sake of interest, try to inspect the steering or seat post, i.e. ask to get out
saddle (the stearing wheels of modern MTB and hybrids are usually not removable).
To check if the chain is shortened, put it on the biggest gears in front and behind, if the chain is significantly shortened, its length will not be enough.
(never use this gear combination in cycling - the friction is enourmously stronger in this setup).
How to figure out if price is ok for used bicycle
Check what is the price of new bicycle of the same model and try to estimate
how much it was used.
If it is impossible to find out how much a new analogue costs, for example, because the bike is too old, remember that you can estimate
cost of individual parts
уровень обвеса, модель тормозов.
If this is unreal, then remember that usually the V-brake is cheaper than the disc brakes.
Mechanical Disk breaks are cheaper than hydraulic ones.
Weight is less, the better.
Double rims are more expensive than single rims.
Metal pedals are usually more expensive than plastic ones.
The quality of the wings can also be
to appreciate by eye.
Thin cylindrical flu (ergonomic tubular nozzles on the ends of the rudder in the grip zone) is cheaper than the flu with variable
thick.
A fork with shock absorption is more expensive than a hard one.
How to avoid creaking when v-braking
Get some sandpaper and rub the rims.
Maintenance Handlebar
- Search on this website
- aofeed - Telegram channel for updates
- aofeedchat - Телеграм group for questions
|
Share in social media:
|